

Slug: how-to-design-your-own-cheerleading-uniforms
Categorie: Productkennis (60)
Tags: custom design, cheer uniform design, design process, DIY uniforms, team branding
Primary Keyword: design cheerleading uniform
Meta Desc: Step-by-step guide to designing your own cheerleading uniforms — from choosing colors and fonts to logo placement and rhinestone details. Free design tips included.
—
Artikelinhoud
Title: Hoe je je eigen cheerleading-uniformen ontwerpt: Een stap-voor-stap gids
Een van de meest spannende delen van het krijgen van nieuwe cheerleading-uniformen is het ontwerpproces - het zien van de persoonlijkheid van je team, schoolkleuren, en visie komen tot leven in stofvorm. Maar als je nog nooit aangepaste uniformen eerder hebt ontworpen, kan het proces overweldigend voelen.
Waar begin je? Wat moet je verstrekken? Hoe zorg je ervoor dat het eindproduct er professioneel uitziet?
Deze gids leidt je door elke stap van het aangepaste cheerleading-uniform-ontwerpproces - van je eerste idee tot het definitieve productiebestand.
—
Stap 1: Definieer je ontwerpbrief
Voordat je een ontwerpsoftware opent, Begin met een duidelijke brief:
- Hoeveel kleuren? Most teams use 2-4 kleuren (schoolkleuren + accentkleuren)
- Wat is het primaire element? A mascot logo? A school name? A team name?
- Wat is de vibe? Bold and energetic? Classic and clean? Modern and flashy?
- Wie is het publiek? Competition judges, school administration, fans, or recruits?
- Wat zijn de beperkingen? Budget limits, school branding guidelines, uniform regulations?
Het schrijven van deze antwoorden voordat je begint voorkomt mid-design herzieningen - en bespaart tijd en geld.
—
Stap 2: Kies uw kleurenpalet
Your team colors are the foundation of the design. Here is how to work with them:
Start with your primary colors: De belangrijkste kleuren van uw school of organisatie. These should be immediately recognizable in the uniform.
Add accent colors: Een of twee extra kleuren voor trim, nummers, of ontwerp accenten. Minder is meer te veel kleuren verdunnen de impact.
Consider contrast: High contrast between your main and accent colors creates visual punch. Low contrast can make the design feel muddy, especially from a distance in a large arena.
Mind the printing constraints:
- Screen printing works best with 1-4 solid colors
- Sublimation allows unlimited colors and gradients with no additional cost
- Rhinestones are typically one color (usually crystal clear, black, or a team color)
—
Stap 3: Werk met uw logo en mascot
The team mascot or logo is usually the centerpiece of the uniform. Here is how to handle it:
Provide a high-resolution file: Vector files (AI, EPS, SVG) are best — they can be scaled to any size without pixelation. High-resolution PNG or JPEG (300 DPI at actual size) also works.
Check the orientation: Sommige mascotten zien er geweldig uit horizontaal, anderen verticaal. Decide early whether the logo goes on the chest, back, or both — and adjust the proportions accordingly.
Simplify for small sizes: A detailed mascot looks great on the back. On the front chest (where space is limited), simplify the design to key recognizable elements.
Respect official branding: If your mascot or school logo has official branding guidelines (kleuren, proportions, minimum size), follow them. This is especially important for school and collegiate teams.
—
Stap 4: Kies uw lettertypen en typografie
Typography is often underestimated in uniform design — but it has a huge impact.
Script lettertypen: Give a feminine, elegant, of traditioneel gevoel. Popular for all-star and club teams.
Blok lettertypen: Bold, leesbaar, and authoritative. Standard for team names, scholen, and competition numbers.
Atletische/stencil lettertypen: Aggressief, hoge energie. Common in competitive cheerleading. Think angular letterforms with strong visual impact.
Number font: Keep numbers highly legible from a distance. A clean athletic font with a slight italic (to suggest forward motion) works best.
Tip: Beperk tot 2 lettertypen stijlen maximaal. More than that looks chaotic.
—
Stap 5: Beslis over patroon en lay-out
This is where the creative decisions get specific:
Chest design: Where does the logo go? Top-left? Centered? How big?
Back design: Full logo? Just the team name? Both name and number?
Side panels: Often sublimated with patterns, stripes, or school initials
Number placement: Standard is center back, but some teams also put numbers on the front chest or shorts
Gemeenschappelijke uniforme lay-out patronen:
- Front: School name + small logo + number. Back: Large mascot + full team name + captain designation
- Front: Large team name. Back: Full mascot + individual athlete name + number
- Full sublimation: Mascot and design flow across front, back, and side panels continuously
—
Stap 6: Choose Your Customization Method
The customization method affects both cost and design possibilities:
| Method | Best For | Design Flexibility |
|——–|———-|——————-|
| Sublimation | Full-coverage, complex designs, gradients | Maximum |
| Screen printing | Simple 1-4 color designs | Moderate |
| Appliqué | Letterman-style, varsity numbers | Limited |
| Strass | Sparkle accents, logo highlights | Decorative only |
| Embroidery | Names on front, formal wear | Text and simple logos |
Most teams use a combination: sublimation for the body design, screen printing for numbers and names, rhinestones for sparkle.
—
Stap 7: Review and Approve the Design Mockup
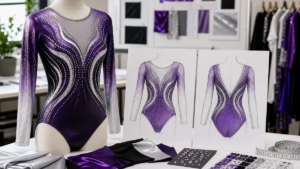
Before production begins, you will receive a digital mockup (usually a PDF or JPG) showing exactly how the uniform will look.
Checklist for design approval:
- [ ] All colors match your specifications exactly
- [ ] Logo proportions look correct on both front and back
- [ ] Text is readable and correctly spelled
- [ ] Numbers are in the right font and size
- [ ] No unintended text, watermarks, or placeholder elements
- [ ] Rhinestone placement is as discussed (if applicable)
- [ ] Side panel designs look balanced
- [ ] Athletes of different body types have been accounted for in the design
Important: Once you approve the mockup and production begins, changes become expensive or impossible. Take your time at this stage.
—
Stap 8: Order a Sample Before Bulk Production
If your order is 20+ units, always request a sample uniform before the full production run. This lets you:
- Verify the actual fabric quality and weight
- Check that sublimation colors match your mockup
- Confirm the fit on different body types
- See the rhinestone application quality (if applicable)
- Catch any errors before they are multiplied across 50+ uniforms
Most manufacturers offer a sample for a small fee (or waive it with a bulk order). Budget for this — it is much cheaper than reordering 50 wrong uniforms.
—
Uiteindelijke gedachten
Designing custom cheerleading uniforms is a creative process — but it does not have to be intimidating. Start with a clear brief, make deliberate choices about colors and fonts, and review the mockup carefully before approving.
The best uniforms tell a story: your team, your school, your identity. Take the time to tell that story well.
—
Ready to start your custom uniform design?
Get a free design consultation
—
Word count: ~1,150 | Tags: custom design, cheer uniform design, design process, team branding